It was a lot of work. I did not count all the flowers but I guess more than 60 and it took me more than 10 hours work. I did not use a die and cut all the flowers by hand, but if you have one that would be alot easier.
I made a step-by-step tutorial on how I made this foamiran hydrangea. I made about 18 flowers at a time. This took me about an hour each time. Then I had 6 bunches with 3 flowers.
Step 1:
I used white foamiran for this project. I cut pieces of 3 cm by 3 cm (1,1 inch x 1,1 inch).
Step 2:
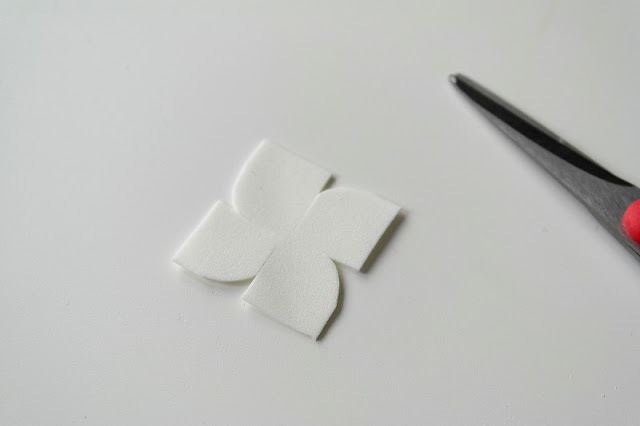
You cut 4 times in the middle of each side.
Step 3:
You cut the petal shapes. First on one side, then you flip it over and cut the other side.
At the bottom of this blogpost is a link to a video tutorial (in russian) where this technique is demonstrated.
The petals don't have to be perfect. In nature the petals aren't perfect either and when the foam is heated you won't see it.
If you have a four petal die than I advice you to use that one. It's much faster.
Step 4:
You color all the flowers. This can be done with oil pastels, inks or even chalks. I used oil pastels in yellow, pink and green. Some leaves have more than one color.
You color both sides.
Step 5:
Pre heat your iron (mine is between 2 to 3 dots heat) and hold the flowers a few second agains the heated iron. The flower will curl and shape.
Step 6:
You prick a hole in the middle of the flowers and put a flower stamen through it. I used pink and white stamens. I cut off one of the ends.
Step 7:
The gluing. With my hot glue gun I put a little bit of glue on the stamen, pull it down and press between my fingers at the bottom of the flowers. This technique is also shown in the video.
Step 8:
I cut a little piece of floral wire and taped 3 flowers together with the wire. I used a piece of wire otherwise I couldn't prick it in the styrofoam, but you can skip this part and glue the flowers directly on the styrofoam ball.
Step 9:
I used a styrofoam ball from about 6 cm (2,3 inch).
I prick a hole in it and pushed the flowers in. Different colors next to each other. Tightly together so you can see the styrofoam. You work your way around untill the whole ball is filled.
The stem is a pencil wrapped with flowertape.
I put my hydrangea in a bowl filled with flower oasis and covered it with reindeer moss.
The little butterfly is a paper punch out and I've added a green organza ribbon.
Here is a link to a video tutorial in Russian. https://www.youtube.com/watch?v=VzAyGuDd2E8.
On this video you can watch how the flowers are cut and shaped. I did some steps different than she does it.
I hope my step by step instruction is clear enough. If you have any questions just ask in a comment.
Thanks for stopping by.
Hugs, Henriette.


1 comment
Incredibly gorgeous, Henriette...I'm not sure I have the patience you have, but I would love to try this. Thank you for the tutorial and sharing your stunning art work.
Post a Comment