Hi, today I'm on the 14 craft bar blog sharing 2 cards with foamiran flowers in rainbow colors.
There's also a little tutorial on how I've created the flowers. I used the same die for both kinds of flowers.
The stamps I used for the sentiments are from a previous Simon Says Stamp monthly cardkit.
More info on the 14 craft bar blog.
http://14craftbar.blogspot.nl/2018/02/rainbow-flowers.html
I hope you'll take a look there.
Hugs, Henriette.
Showing posts with label foamiran flower. Show all posts
Rainbow colors
Tuesday, February 6, 2018
Exploding Box with 3D house and foamiran flowers
Thursday, January 25, 2018
In December I played in the Lemoncraft challenge and was lucky enough to won the first price.
I'm entering this box in these challenges:
http://www.simonsaysstampblog.com/wednesdaychallenge/simon-says-layer/
http://noordesign-uk.blogspot.nl/2018/01/january-challenge-2018anything-goes.html
and
http://scrapmagia-ru.blogspot.nl/2018/01/blog-post.html
I ordered some great stuff from there online shop and once it arrived I decided to make a exploding box using some of the things I won.
The paperpads I used to decorate the exploding box are from Lemoncraft called "Bird song"and "Just love me".
I've decorated the lit with foamiran flowers. I used all kinds of dies I have in my stock. The foamiran is from 14 craft bar. I also added ribbon, pompom balls, leaves and a little key.
As this is an exploding box for a new house, I placed a cardboard house inside.
The cardboard house is also from lemoncraft and I painted it with pink, blue and white acrylic paint.
Isn't it cute?
Here is a top view once the lit of the box is removed.
I made the saying and words on my computer and printed them on white cardstock.
I also added painted chipboard bricks.
I put glossy accents on the little wood veneer heart.
And another key, also painted after I covered it with gesso.
On my you tube channel you can watch a short video of this exploding box.
Here is the link:
I'm entering this box in these challenges:
http://www.simonsaysstampblog.com/wednesdaychallenge/simon-says-layer/
http://noordesign-uk.blogspot.nl/2018/01/january-challenge-2018anything-goes.html
and
http://scrapmagia-ru.blogspot.nl/2018/01/blog-post.html
Inspired by the brick wall and the flowers.
Thanks for stopping by.
Hugs, Henriette.
Gift box with foamiran flowers
Tuesday, January 23, 2018
Hi, today I'm sharing this gift box with foamiran flowers.
Before I start a project I often look on Google or Pinterest for a nice colorscheme and for this project I used this beautiful mint and peach color scheme.
I started by folding the gift box. It's a box with window from 14 craft bar and perfect for sending your big foamiran cards, but can also be decorated.
Then I covered the lit with gesso and applied crumpled mint tissue paper on it with another layer of gesso (I taped off the window).
After the gesso dried I glued on the foamiran flowers and paper leaves with my hot glue gun.
All the foamiran, flowers centres and stamens used are from the 14 craft bar online shop.
I used various dies to cut out the foamiran flowers.
Inside the box I used the same tissue paper that is on the lit.
I do like the color combination on this box.
That's it for me today. Thanks so much for stopping by my blog.
Hugs, Henriette.
Birthday card with Organza Foam flowers
Sunday, January 21, 2018
Hi and happy Sunday,
Yesterday I wrote a blog post on the 14 craft bar blog sharing a birthday card with organza foam flowers on it. Organza foam is the thinnest foam on the marker. The flowers are so pretty and fluffy.
For more info and photo's here is the link to that blog post.
http://14craftbar.blogspot.nl/2018/01/pretty-in-blue-organza-foam-flowers.html
Have a wonderful day!
Hugs, Henriette
Vintage winter foamiran flowers
Sunday, January 14, 2018
Hi, today I'm sharing a card I've made with a vintage winter theme.
I've recorded a video on how I've made the flowers. Making video tutorials is my biggest goal for the new year and this video is my second one and better than the first. It's on my you tube channel and I hope you'll take a look and give me some feedback on it.
The foamiran and stamens I used to make the flowers are from 14 craft bar.
The paper used on this card is from lemoncraft; house of roses.
The chipboards are from scrapiniec. I dapped gesso on it to make them white. The enamel dots are from create a smile and the sentiment stamp and label dies are from inspired by stamping.
Here is the link to the video tutorial on how I've made the orange and little white flowers.
https://youtu.be/982dFza2YhY
I hope you like the card and my video tutorial and I would appreciate your feedback.
I'm entering this card in these challenges:
http://blog.lemoncraft.pl/2018/01/wyzwanie-styczniowe-january-challenge.html
http://noordesign-uk.blogspot.nl/2018/01/january-challenge-2018anything-goes.html
https://foamiranpolska.blogspot.nl/2018/01/wyzwanie-16-temat-dowolny.html
Thanks for stopping by today.
Hugs, Henriette.
Peony with organza foam
Thursday, January 4, 2018
Hi, yesterday I've made a flower using the thinnest foam on the market, it's called organza foam.
This foam is available at 14craftbar.com. It's super thin and very delicate and soft.
Not easy to work with, I must admit, it can tear very easily.
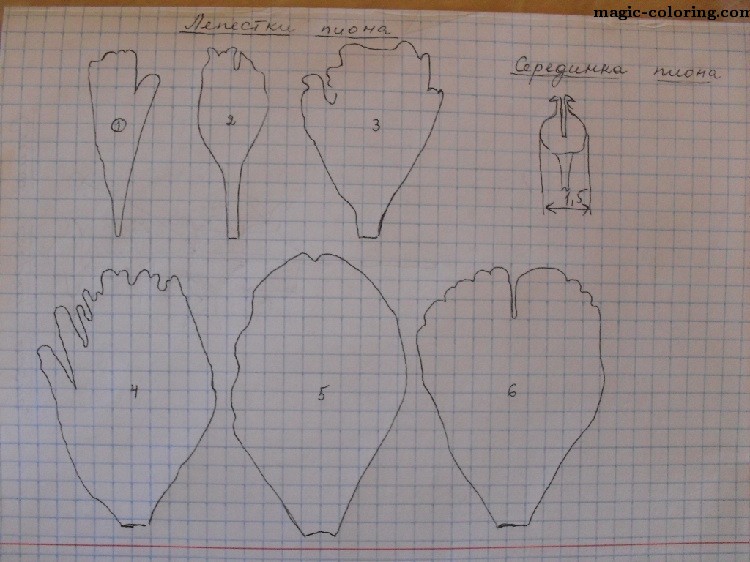
I cut out the petals by hand using a template I found here. About 7 to 9 of each. The more petals you use the bigger the flower will be.
This foam is available at 14craftbar.com. It's super thin and very delicate and soft.
Not easy to work with, I must admit, it can tear very easily.
I cut out the petals by hand using a template I found here. About 7 to 9 of each. The more petals you use the bigger the flower will be.

With a lilac ink pad I dabbed the petals and then rolled the top gently between my fingers and shaping the petals.
I made the centre using a styrofoam ball covered with two layers of the organza foam, some stamens and I glued the petals using my heatgun.
It turned out very pretty and soft. I like the lilac color very much.
I'm entering this foamiran flower in the Noor design January challenge.
Thanks for stopping by today!
Hugs, Henriëtte.
Labels:
foamiran,
foamiran flower,
foamiran peony,
organza foam,
organza foamiran,
peony
More foamiran flowers
Wednesday, October 11, 2017
Hi, today I've been making more foamiran flowers and also a gift box with one of the flowers on it.
The idea for the flowers I found on mag fantasy blogspot. I just loved that flower and also the way she made the centre with all the little beads. So I decided to make kind of the same flower.
For the open flowers I used a poinsettia die (small posh outline) from poppy stamps and the other ones a flower die set from 14 craft bar.
The foamiran is also from 14 craft bar. I used 2 shades of green and a blue.
The micro beads are metalized micro beads. It was the first time I worked with these tiny tiny beads and I really liked it (although my desk became full of micro beads).
I also used these micro beads on the brances.
I made a box using the same color paper as the flowers are and glued the flower and branches on the lid.
Then I stamped a little for you sentiment (stamp is from inspired by stamping) and attached it to the box.
That's it for today! Thanks for stopping by.
Hugs, Henriette.
Labels:
14 craft bar,
foamiran,
foamiran flower,
foamiran flowers,
gift box,
micro beads
Autumn wreath with foamiran flowers
Friday, September 15, 2017
Today I've finished my foamiran autumn wreath.
This past week I had a week off from work and plenty of time to make the flowers and leaves on this wreath.
I bought the wreath itself at a garden center. The berries are not made by me (although I want to try to make these in the near future). All the other flowers are handmade using foamiran from 14 craft bar. The feathers are from ebay.
Here are some close up pictures of the flowers.
I colored all my flowers with chalks not with soft pastels this time. I like working with chalks a bit better I guess. I've created a dahlia, a sunflower, hydrangea, a vintage rose and a few fantasy flowers. I have a previous tutorial on how to make hydrangea flowers here.
This past week I had a week off from work and plenty of time to make the flowers and leaves on this wreath.
I bought the wreath itself at a garden center. The berries are not made by me (although I want to try to make these in the near future). All the other flowers are handmade using foamiran from 14 craft bar. The feathers are from ebay.
Here are some close up pictures of the flowers.
Look at those cute stamens in the orange flowers. These are also from 14 craft bar.
I did use dies for the orange flowers but for the other flowers I hand cut every petal. I made the leaves by printing free templates from internet and cutting the shapes out of foamiran.
That's it for today.
I really would appreciate it if you tell me what you think of this autumn wreath.
Thanks so much for stopping by.
Hugs Henriette,
Foamiran flower
Sunday, August 20, 2017
I made this foamiran flower a few weeks ago and forgot to write a blog post about it and now I can't recall where I've got the idea from and how I've made it. Especially the centre of the flower. I'm sorry. Well I hope you will enjoy the pictures of the flower.
Hugs, Henriette.
Hugs, Henriette.
Foamiran Dahlia
Today I'm sharing a foamiran dahlia. It resembles the chrysanthemum flower I made last April.
For this dahlia I used a template I found on internet. You can find the template here.
It's in Russian so I don't understand what it says but I've cut as many leaves as is in the middle of the templates. For example the biggest petals I've cut 5 times.
For the petals I've used white foamiran and for the green leaves I used green foamiran.
For the coloring pink and yellow chalks and baby wipes. For the green leaves I used green and brown chalks.
For the centre of the flower I used a ball of silver foil covered with the yellow colored foamiran.
I glued all the pieces together with my hot glue gun.
The cutting of the petals takes the most of the time to create this flower, maybe if you have that kind of dies you can use them.
Good luck if you are going to make the same flower, it will look beautiful.
Hugs, Henriette.
Scabious foamiran flower
Tuesday, August 15, 2017
Sharing another foamiran flower I've made these past days. It's a kind of scabious flower but not quite the same.
I watched this video with a tutorial (it's in Russian) and used this template.

The foamiran I bought at 14craftbar .
I did not follow the steps exactly the same way but gave my own twist to the flower.
For the center of the flower I used little green and blue styrofoam balls. I used some cheap super glue but the balls reacted strangely to the glue and began to shrink. It did not bother me much so I left it as it was.
Thanks for stopping by today!
Hugs, Henriette.
I watched this video with a tutorial (it's in Russian) and used this template.
The foamiran I bought at 14craftbar .
I did not follow the steps exactly the same way but gave my own twist to the flower.
For the center of the flower I used little green and blue styrofoam balls. I used some cheap super glue but the balls reacted strangely to the glue and began to shrink. It did not bother me much so I left it as it was.
Thanks for stopping by today!
Hugs, Henriette.
Subscribe to:
Posts (Atom)


